Skip to content

Subnautica 2 All Equipment Blueprint Guide: Locations of Processor, Submarine Elevator, Growbed, etc.

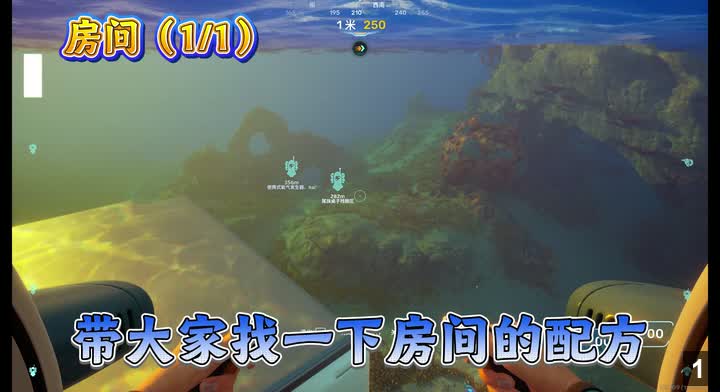
Summarizes the locations of all equipment blueprints in Subnautica 2, including Processor, Room Recipe, Power Transmitter, Scanner Station, Submarine Elevator, Thermal Generator, Bio Lab, Bio Bed, Dock Recipe, Power Storage, Bioreactor, Power Cell Terminal, Electronic Terminal, Growbed, Metal Farm. Guided by directions and landmarks, with prerequisite tool requirements.

  • Guide topic: Equipment Unlocking

Prerequisites

  • Acoustic Resonator (clears spider webs)
  • Tadpole (Seamoth) Deep Dive Module (for reaching Metal Farm)
  • Signal Flare or Lure (to distract Leviathans)
  • Heat-resistant Gear (to enter high-temperature zones)

Identification and Corrections

  • In voice recognition, '210 degrees southwest by south' actually means the southwest by south direction; 'Dock Recipe' may be 'Shipyard Recipe'; the term 'Diweitan' refers to Leviathan; 'Tadpole' refers to Seamoth; 'Acoustic Resonator' is the correct name.
  • Some wreck locations depend on the spawn point direction; it is recommended to mark them with beacons.
  • High-temperature zones require heat-resistant gear to enter.

Simplified Steps

Obtain Processor Blueprint

Time: 00:00.080 - 00:30.630

Obtain Processor Blueprint
1 / 122
1

Obtain Processor Blueprint

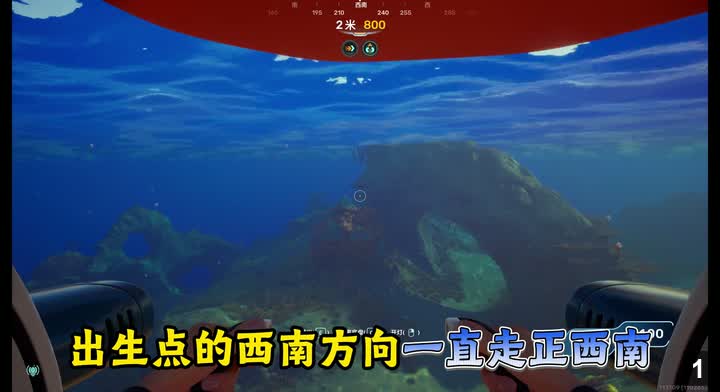
From the spawn point, swim in the southwest by south direction (about 210 degrees) at a 45-degree downward angle. Reach a wreck (restaurant debris). Enter and find the Processor blueprint inside. Requires 1 scan.

Key Points:

  • Direction: Southwest by south (about 210 degrees)
  • Depth: Not mentioned, approximately mid-shallow
  • Scan count: 1
  • Prerequisites: None

Obtain Room Recipe and Power Transmitter

Time: 01:05.620 - 01:32.100

Obtain Room Recipe and Power Transmitter
1 / 106
2

Obtain Room Recipe and Power Transmitter

Similarly, from the spawn point, swim southwest by south (about 210 degrees). Find another wreck and enter through the door. Power Transmitter is in the first room; Room Recipe is in another room inside. Requires 1 scan each.

Key Points:

  • Direction: Southwest by south (about 210 degrees)
  • Wreck entrance is obvious
  • Scan count: 1 each
  • Prerequisites: None

Obtain Scanner Station Blueprint

Time: 01:35.160 - 01:54.430

Obtain Scanner Station Blueprint
1 / 77
3

Obtain Scanner Station Blueprint

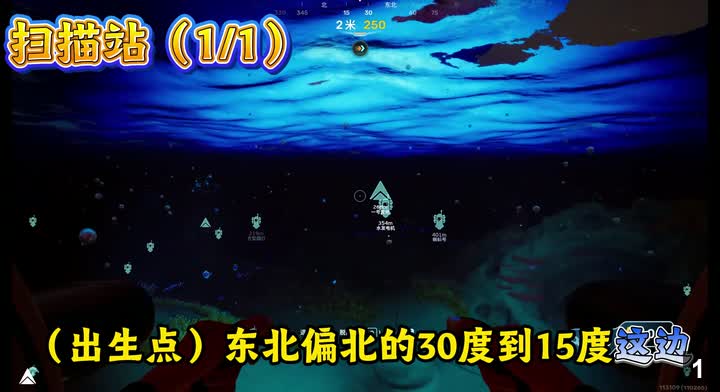
From the spawn point, swim northeast by north (about 15-30 degrees) to find Camp One. Below the camp, there is a cave entrance. Enter to find the Scanner Station blueprint. Scan 1 time.

Key Points:

  • Direction: Northeast by north (15-30 degrees)
  • Location: Cave entrance below Camp One
  • Scan count: 1
  • Prerequisites: None

Obtain Submarine Elevator Blueprint (Two)

Time: 02:00.410 - 02:33.770

Obtain Submarine Elevator Blueprint (Two)
1 / 134
4

Obtain Submarine Elevator Blueprint (Two)

Using the Reception Center as reference: the first is in a wreck southwest of the Reception Center; from the first location, head directly south to another wreck. Requires 1 scan each.

Key Points:

  • Direction: Southwest by west 240 degrees (first), directly south (second)
  • Reference point: Reception Center
  • Scan count: 2
  • Prerequisites: None

Obtain Thermal Generator Blueprint

Time: 02:36.870 - 02:43.790

Obtain Thermal Generator Blueprint
1 / 28
5

Obtain Thermal Generator Blueprint

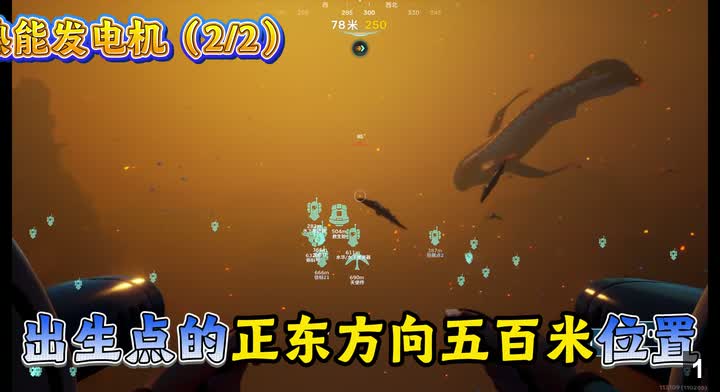
From the spawn point, swim directly east. On the left side of a certain building, find two Thermal Generator blueprints. Scan each once.

Key Points:

  • Direction: Directly east
  • Position: Left side of a building
  • Scan count: 2
  • Prerequisites: None

Obtain Bio Lab Blueprint

Time: 02:46.430 - 02:55.350

Obtain Bio Lab Blueprint
1 / 36
6

Obtain Bio Lab Blueprint

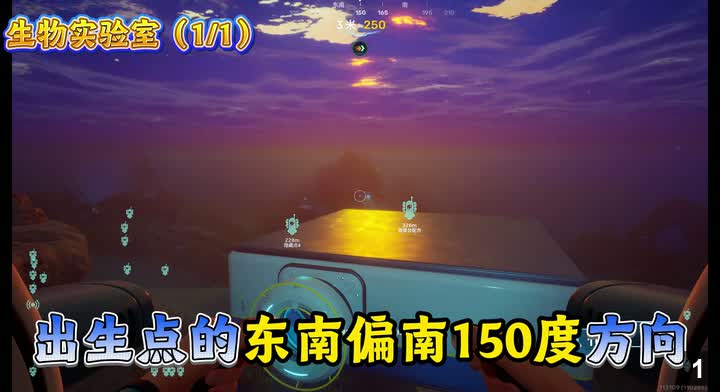
From the spawn point, swim southeast by south (about 150 degrees) to find the Reception Center. Enter and see the Bio Lab blueprint. Scan 1 time.

Key Points:

  • Direction: Southeast by south 150 degrees
  • Location: Inside Reception Center
  • Scan count: 1
  • Prerequisites: None

Obtain Bio Bed Blueprint

Time: 02:58.360 - 03:15.600

Obtain Bio Bed Blueprint
1 / 69
7

Obtain Bio Bed Blueprint

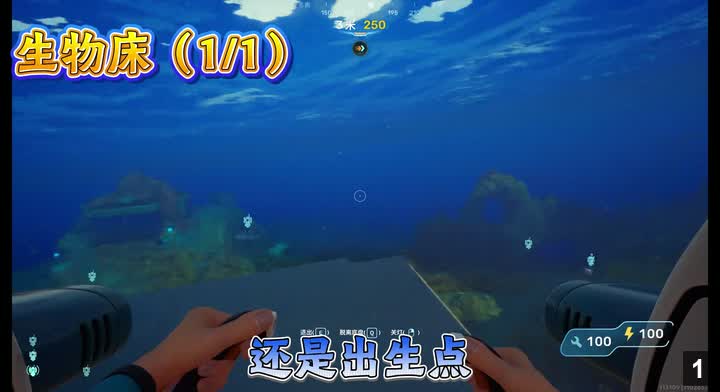
From the spawn point, swim southeast. Look for a glowing marker; there is a small room nearby. Enter to find the Bio Bed blueprint. Scan 1 time.

Key Points:

  • Direction: Southeast
  • Feature: Small room with glowing marker
  • Scan count: 1
  • Prerequisites: None

Obtain Dock Recipe

Time: 03:18.570 - 04:12.810

Obtain Dock Recipe
1 / 217
8

Obtain Dock Recipe

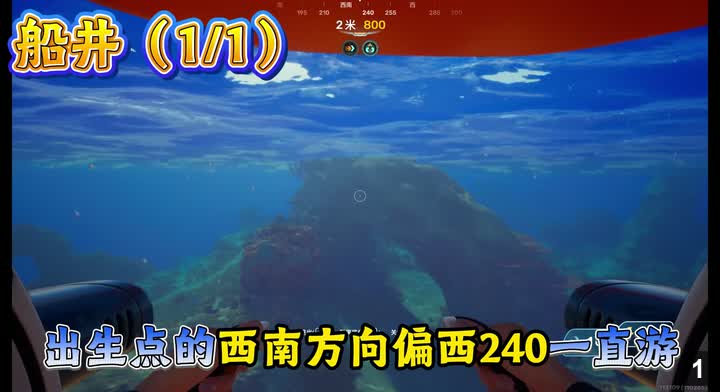
The route is complex: From the endpoint (presumably a landmark), swim southwest by west 240 degrees to a cliff; there is a wreck on the right. Then swim south by southwest 210 degrees to a second wreck. Then head northeast by east, passing through multiple wrecks, finally reaching the back cave entrance of the restaurant debris. Enter and go through multiple rooms and passages; find the Dock Recipe deep inside. Scan 1 time.

Key Points:

  • Direction: Multiple turns, final location inside restaurant debris
  • Passes multiple wrecks
  • Scan count: 1
  • Prerequisites: None

Obtain Power Storage Blueprint (Two)

Time: 04:15.770 - 05:22.720

Obtain Power Storage Blueprint (Two)
1 / 268
9

Obtain Power Storage Blueprint (Two)

First: From the spawn point, swim directly southwest to a cliff. Inside a wreck on the right (a small house near a signal light). Second: Starting from the first, swim northeast by east 75 degrees. Go up the cliff and continue; enter a cave under a pillar. Scan each once.

Key Points:

  • Direction: Directly southwest (first), northeast by east 75 degrees (second)
  • Scan count: 2
  • Prerequisites: None

Obtain Bioreactor Blueprint (Three)

Time: 05:25.720 - 06:58.860

Obtain Bioreactor Blueprint (Three)
1 / 373
10

Obtain Bioreactor Blueprint (Three)

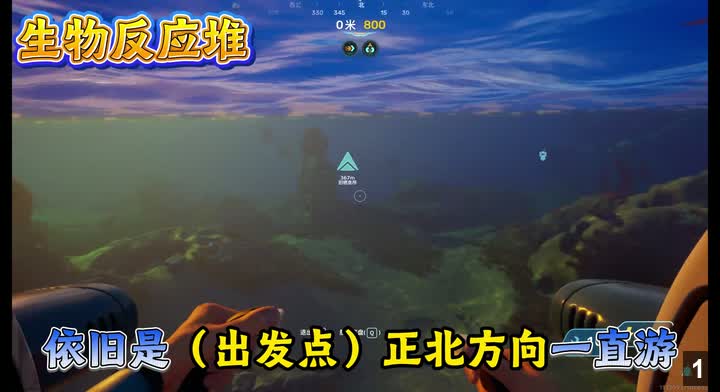
First: From the spawn point, swim directly north and enter a wreck (route complex; refer to video). Second: Swim directly southeast (horizontal), pass the Reception Center, and enter a small cave with a signal light. Third: From the second, swim north by northeast 15 degrees horizontally, pass two large wrecks, and enter a door at a location with a large hole and water currents (directly east). Scan each once.

Key Points:

  • Direction: Directly north (first), directly southeast (second), north by northeast 15 degrees (third)
  • Scan count: 3
  • Prerequisites: None

Obtain First Power Cell Terminal

Time: 07:01.760 - 07:24.230

Obtain First Power Cell Terminal
1 / 90
11

Obtain First Power Cell Terminal

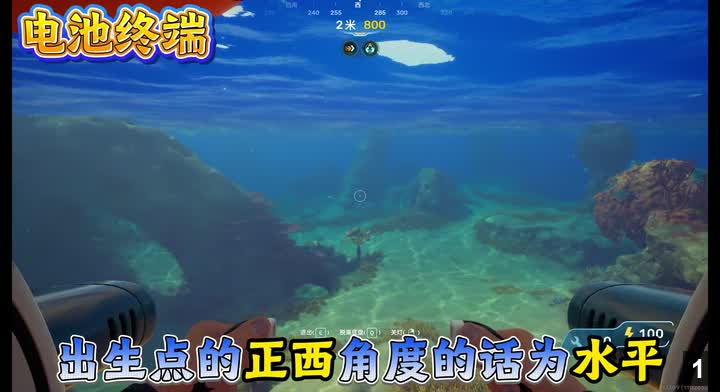
From the spawn point, swim directly west horizontally. Pass a small wreck and continue. At a place blocked by spider webs, use the Acoustic Resonator to clear them, then obtain the first Power Cell Terminal. Scan 1 time. Requires Acoustic Resonator.

Key Points:

  • Direction: Directly west
  • Obstacle: Spider webs (require Acoustic Resonator)
  • Scan count: 1
  • Prerequisites: Acoustic Resonator

Obtain Electronic Terminal Blueprint

Time: 07:25.000 - 07:53.060

Obtain Electronic Terminal Blueprint
1 / 112
12

Obtain Electronic Terminal Blueprint

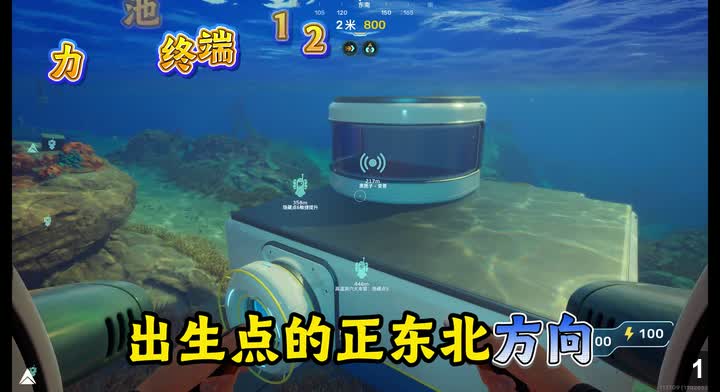
From the spawn point, swim directly north to reach Ginkgo House. Go around to its underside and enter a wreck. After two rooms, find the Electronic Terminal on the right. Scan 1 time.

Key Points:

  • Direction: Directly north
  • Location: Under Ginkgo House
  • Scan count: 1
  • Prerequisites: None

Obtain Second Power Cell Terminal

Time: 07:56.050 - 08:23.370

Obtain Second Power Cell Terminal
1 / 109
13

Obtain Second Power Cell Terminal

From the spawn point, swim directly northeast horizontally. Enter the heat-resistant high-temperature zone. Below, there are two caves; go down the right cave and swim all the way to the High-Temperature Base Camp. Enter and find it on the right. Scan 1 time. Requires heat-resistant gear.

Key Points:

  • Direction: Directly northeast
  • Region: High-temperature zone Base Camp
  • Scan count: 1
  • Prerequisites: Heat-resistant gear

Obtain Third Power Cell Terminal

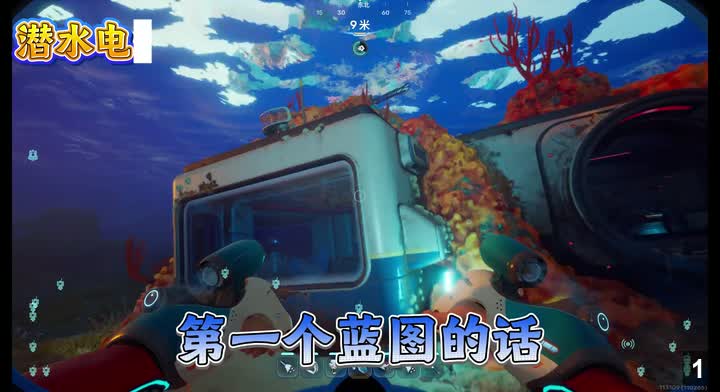
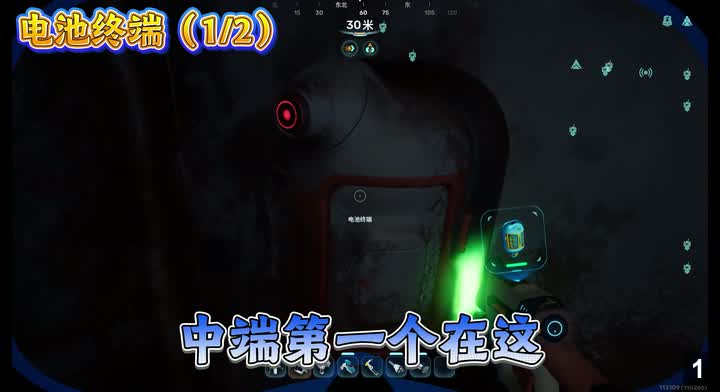
Time: 08:23.570 - 08:45.520

Obtain Third Power Cell Terminal
1 / 88
14

Obtain Third Power Cell Terminal

Starting from the second Power Cell Terminal location, first swim out of the cave. Adjust direction to north by northeast 15 degrees horizontally. Enter a cave and find it. Scan 1 time.

Key Points:

  • Direction: North by northeast 15 degrees
  • Position: Inside a cave
  • Scan count: 1
  • Prerequisites: Completed second terminal

Obtain Growbed Blueprint (Two)

Time: 08:54.480 - 09:34.650

Obtain Growbed Blueprint (Two)
1 / 161
15

Obtain Growbed Blueprint (Two)

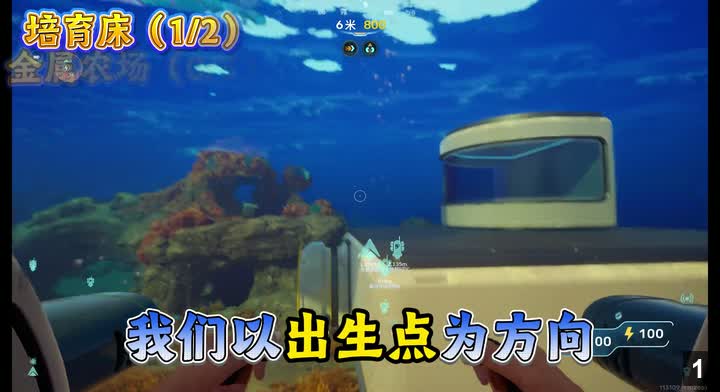
From the spawn point, swim directly east about 600 meters. Cross the high-temperature zone to reach the Red Earth Plains. Beware of Leviathans (use Signal Flares to distract). Find two Growbed blueprints inside the Alien Ruins wreck. Scan each once.

Key Points:

  • Direction: Directly east
  • Distance: About 600 meters
  • Region: Red Earth Plains
  • Note: Avoid Leviathans
  • Scan count: 2
  • Prerequisites: Heat-resistant gear, Signal Flare

Obtain Metal Farm Blueprint (Three)

Time: 09:36.260 - 10:45.690

Obtain Metal Farm Blueprint (Three)
1 / 278
16

Obtain Metal Farm Blueprint (Three)

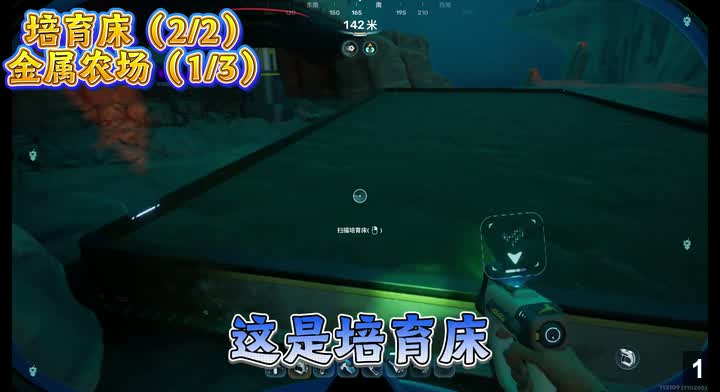
Starting from the Growbed location, first swim directly east horizontally to a cliff. Then turn northeast by east 60 degrees, look 45 degrees downward, and continue until near the map boundary. Then turn east by southeast 105 degrees (or directly northeast). Find the Metal Farm below the cliff. Beware of a flying Leviathan; requires Tadpole Deep Dive Module. Scan 3 times.

Key Points:

  • Direction: Multiple turns, final below cliff
  • Distance: Near map boundary
  • Note: A second Leviathan present
  • Scan count: 3
  • Prerequisites: Tadpole (Seamoth) Deep Dive Module

Frequently Searched Questions

  • Where to find the Processor blueprint in Subnautica 2?
  • How to obtain the Submarine Elevator blueprint?
  • Location of the Bioreactor blueprint?
  • What prerequisites are needed for the Metal Farm blueprint?
  • Order of unlocking all blueprints in Subnautica 2

Built for multilingual gameplay walkthroughs.